想ひ出20: GCP/Flask1.0/ローカルからCloudStorageにアップロードしてみる

おはようございます、moqrinです。
前々回に、GCEにデプロイしたFlaskのチュートリアルをCloudSQLと接続しました。
今度はCloudStorageを使ってローカルからUploadしてみようぜ、というお話です。
なお、基本的に過去の記事からの延長なのでご留意下さい。
やること
1. モデルを修正してマイグレーション
2. CloudStorageを作成してallUsersで閲覧OKにする
3. サービスアカウントキーを作成して手元に保存
4. 環境変数にサービスアカウントの情報を設定する
5. configにプロジェクトIDを設定
6. storage.pyを作成
7. Blueprintを修正
8. 画面フォームを修正
9. 確認
1. モデルを修正してマイグレーション
テーブルに画像保存するURLと画像名のColumnを追加します。
# app/models.py

from app import db, login_manager
from flask_login import UserMixin

class User(UserMixin, db.Model):

    __tablename__ = 'user'

    id = db.Column(db.Integer, primary_key=True)
    username = db.Column(db.String(60), nullable=False, unique=True)
    password = db.Column(db.String(128), nullable=False)


@login_manager.user_loader
def load_user(user_id):
    return User.query.get(int(user_id))

class Post(db.Model):

    __tablename__ = 'post'

    id = db.Column(db.Integer, primary_key=True)
    author_id = db.Column(db.Integer, db.ForeignKey('user.id'), nullable=False)
    created = db.Column(db.TIMESTAMP, nullable=False)
    title = db.Column(db.String(200), nullable=False)
    body = db.Column(db.String(200), nullable=False)
    """
    追記
    """
    file_url = db.Column(db.TEXT(), nullable=False)
    filename = db.Column(db.String(200), nullable=False)
下記コマンドでマイグレーション対応完了です。
すでにテーブルがある場合はテーブル削除してから実行します。
flask db init
flask db migrate
flask db upgrade
2. CloudStorageを作成してallUsersで閲覧OKにする
Storageを作成して、allUsersで閲覧OKのメンバー追加します。
設定参考
3. サービスアカウントキーを作成して手元に保存
GCP外のアプリケーションからGoogle Cloud Storage API を有効化してアクセスするためには、サービスアカウントキーが必要となります。
Storageの読み書きできる権限で作成して、お手元にダウンロードします。
Cloud Storage Client Libraries
4. 環境変数にサービスアカウントキーを設定する
アクセス許可してもらうためにサービスアカウントキーをOSに設定しておきます。
export GOOGLE_APPLICATION_CREDENTIALS=path/to/ServiceAccountJsonKey
5. configにStorageが作成されたプロジェクトIDを設定
手っ取り早くこんな感じで設定しています。
# instance/config.py
PROJECT_ID = 'moqrin-storage'
6. storage.pyを作成
ほぼチュートリアルそのままで利用しています。
# app/storage.py

from __future__ import absolute_import

import os
os.getenv("GOOGLE_APPLICATION_CREDENTIALS")

import datetime

from google.cloud import storage
import six
from werkzeug import secure_filename
from werkzeug.exceptions import BadRequest

from app import ALLOWED_EXTENSIONS, PROJECT_ID, CLOUD_STORAGE_BUCKET


def _get_storage_client():
    return storage.Client(
        project=PROJECT_ID)

def _check_extension(filename, allowed_extensions):
    if ('.' not in filename or
            filename.split('.').pop().lower() not in allowed_extensions):
        raise BadRequest(
            "{0} has an invalid name or extension".format(filename))


def _safe_filename(filename):

    filename = secure_filename(filename)
    date = datetime.datetime.utcnow().strftime("%Y-%m-%d-%H%M%S")
    basename, extension = filename.rsplit('.', 1)
    return "{0}-{1}.{2}".format(basename, date, extension)


def upload_file(file_stream, filename, content_type):

    _check_extension(filename, ALLOWED_EXTENSIONS)
    filename = _safe_filename(filename)

    client = _get_storage_client()
    bucket = client.bucket(CLOUD_STORAGE_BUCKET)

    blob = bucket.blob(filename)

    blob.upload_from_string(
        file_stream,
        content_type=content_type)

    url = blob.public_url

    if isinstance(url, six.binary_type):
        url = url.decode('utf-8')

    print(url)

    return url
7. Blueprintを修正
下記の公式ドキュメントを参考にアップロード機能を実装していきます。
追記の部分を記載していきます。元はこちらです。
# app/__init__.py
...

ALLOWED_EXTENSIONS = set(['txt', 'pdf', 'png', 'jpg', 'jpeg', 'gif'])
PROJECT_ID = PROJECT_ID
CLOUD_STORAGE_BUCKET = 'YOUR-BUCKET-NAME'

...

def create_app(test_config=None):

...

    return app
# app/blog.py

from flask import (
    Blueprint, flash, g, redirect, render_template, request, url_for
)

from app import storage
from . import db, ALLOWED_EXTENSIONS
...

bp = Blueprint('blog', __name__)


def allowed_file(filename):
    return '.' in filename and \
           filename.rsplit('.', 1)[1].lower() in ALLOWED_EXTENSIONS

def upload_image_file(file):

    if not file:
        return None

    public_url = storage.upload_file(
        file.read(),
        file.filename,
        file.content_type
    )

    return public_url

...

@bp.route('/create', methods=('GET', 'POST'))
@login_required
def create():
    if request.method == 'POST':
        title = request.form['title']
        body = request.form['body']
        error = None

        if not title:
            error = 'Title is required.'

        if 'img_file' not in request.files:
            flash('No file part')
            return redirect(request.url)
        file = request.files['img_file']

        image_url = upload_image_file(request.files.get('img_file'))

        if error is not None:
            flash(error)
        else:
            post = Post(title=title,
                        body=body,
                        author_id=g.user.id,
                        file_url=image_url,
                        filename=file.filename
                        )
...

@bp.route('/<int:id>/update', methods=('GET', 'POST'))
@login_required
def update(id):
    post = Post.query.get_or_404(id)

    if request.method == 'POST':
        title = request.form['title']
        body = request.form['body']
        error = None

        if not title:
            error = 'Title is required.'

        if error is not None:
            flash(error)

        if 'img_file' in request.files:
            file = request.files['img_file']

            if file and allowed_file(file.filename):
                image_url = upload_image_file(request.files.get('img_file'))
            post.id = id
            post.title = title
            post.body = body
            post.file_url = image_url
            post.filename = file.filename
            db.session.commit()
            flash('Successfully edited the post.')

        else:
            post.id = id
            post.title = title
            post.body = body
            db.session.commit()
...
8. 画面フォームを修正
画像表示およびアップロードができるように修正します。
# app/templates/blog/index.html

{% extends 'base.html' %}

{% block header %}
<h1>{% block title %}Posts{% endblock %}</h1>
{% if current_user.is_authenticated %}
<a class="action" href="{{ url_for('blog.create') }}">New</a>
{% endif %}
{% endblock %}

{% block content %}
{% for post in posts %}
<article class="post">
    <header>
        <div>
            <h1>{{ post.title }}</h1>
            <div class="about">by {{ post.username }} on {{ post.created.strftime('%Y-%m-%d') }}</div>
        </div>
        <a class="action" href="{{ url_for('blog.update', id=post.id) }}">Edit</a>
    </header>
    <p class="body">{{ post.body }}</p>
    <img src="{{ post.file_url }}" width="400" height="200">
</article>
{% if not loop.last %}
<hr>
{% endif %}
{% endfor %}
{% endblock %}
# app/templates/blog/create.html

{% extends 'base.html' %}

{% block header %}
<h1>{% block title %}New Post{% endblock %}</h1>
{% endblock %}

{% block content %}
<form method="POST" enctype="multipart/form-data">
    <label for="title">Title</label>
    <input name="title" id="title" value="{{ request.form['title'] }}" required>
    <label for="body">Body</label>
    <textarea name="body" id="body">{{ request.form['body'] }}</textarea>
    <input type="file" id="img_file" name="img_file">
    <input type="submit" value="Save">
</form>
{% endblock %}
# app/templates/blog/update.html

{% extends 'base.html' %}

{% block header %}
<h1>{% block title %}Edit "{{ post['title'] }}"{% endblock %}</h1>
{% endblock %}

{% block content %}
<form method="post" enctype="multipart/form-data">
    <label for="title">Title</label>
    <input name="title" id="title"
           value="{{ request.form['title'] or post['title'] }}" required>
    <label for="body">Body</label>
    <textarea name="body" id="body">{{ request.form['body'] or post['body'] }}</textarea>
    <img src="{{ post.file_url }}" width="400" height="200">
    <input type="file" id="img_file" name="img_file">
    <input type="submit" value="Save">
</form>
<hr>
<form action="{{ url_for('blog.delete', id=post['id']) }}" method="post">
    <input class="danger" type="submit" value="Delete" onclick="return confirm('Are you sure?');">
</form>
{% endblock %}
9. 確認
Google CloudのAPI Client libraryをインストール
pip install gcloud
起動。
export FLASK_APP=run
export FLASK_ENV=development
flask run
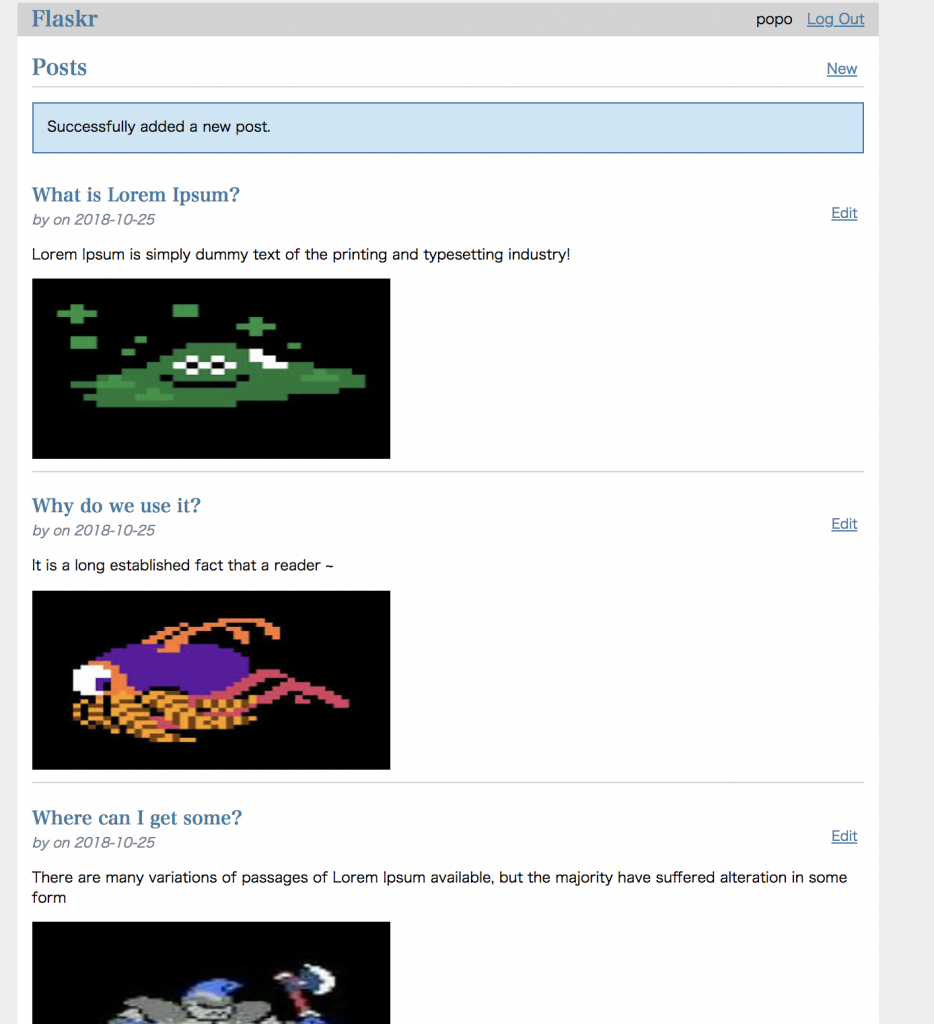
表示を確認して喜びます。

わーい。 でも...やっぱり何だか動作おせーー。。。w
参考:
Python での Cloud Storage の使用
Python Client for Google Cloud Storage
想ひ出19: GCP/Flask1.0/ローカルからDatastoreと接続してみる

おはようございます、moqrinです。
前回に、GCEにデプロイしたFlaskのチュートリアルをCloudSQLと接続しました。
今度はDatastoreを使ってCRUDしてみようぜ、というお話です。
Bookshelf チュートリアルのコードを改悪参考にしています。
なお、基本的に過去の記事からの延長なのでご留意下さい。
やること
1. App Engine アプリケーションを作成
2. サービスアカウントキーを作成して手元に保存
3. 環境変数にサービスアカウントの情報を設定する
4. configにプロジェクトIDを設定
5. モデルを作成
6. Blueprintを修正
7. 画面の修正
8. 確認
1. App Engine アプリケーションを作成
Cloud Datastore API を使用するには、有効化されているApp Engine アプリケーションが必要なので、何か適当に作成します。
引用元: Compute Engine インスタンスから Cloud Datastore API にアクセスする
2. サービスアカウントキーを作成して手元に保存
GCP外のアプリケーションからCloud Datastore API を有効化してアクセスするためには、サービスアカウントキーが必要となります。
Datastoreの読み書きできる権限で作成して、お手元にダウンロードします。
引用元: 別のプラットフォームから Cloud Datastore API にアクセスする
3. 環境変数にサービスアカウントキーを設定する
アクセス許可してもらうためにサービスアカウントキーをOSに設定しておきます。
export GOOGLE_APPLICATION_CREDENTIALS=path/to/ServiceAccountJsonKey
4. configにDatasotreが作成されたプロジェクトIDを設定
手っ取り早くこんな感じで設定しちゃっています。
# instance/config.py
PROJECT_ID = 'moqrin-love'
5. モデルを作成
参考: Python Client for Google Cloud Datastore
# app/model_datastore.py

from google.cloud import datastore

from instance.config import PROJECT_ID
import os
os.getenv("GOOGLE_APPLICATION_CREDENTIALS")

builtin_list = list

def init_app(app):
    pass

def get_client():
    return datastore.Client(PROJECT_ID)

def from_datastore(entity):

    if not entity:
        return None
    if isinstance(entity, builtin_list):
        entity = entity.pop()

    entity['id'] = entity.key.id
    return entity

def list(limit=10, cursor=None):
    ds = get_client()

    query = ds.query(kind='Blog', order=['-created'])
    query_iterator = query.fetch(limit=limit, start_cursor=cursor)
    page = next(query_iterator.pages)

    entities = builtin_list(map(from_datastore, page))
    next_cursor = (
        query_iterator.next_page_token.decode('utf-8')
        if query_iterator.next_page_token else None)

    return entities, next_cursor

def read(id):
    ds = get_client()
    key = ds.key('Blog', int(id))
    results = ds.get(key)
    return from_datastore(results)

def update(data, id=None):
    ds = get_client()
    if id:
        key = ds.key('Blog', int(id))
    else:
        key = ds.key('Blog')

    entity = datastore.Entity(
        key=key,
        exclude_from_indexes=['description'])

    entity.update(data)
    ds.put(entity)
    return from_datastore(entity)


create = update

def delete(id):
    ds = get_client()
    key = ds.key('Blog', int(id))
    ds.delete(key)
6. Blueprintを修正
DatastoreのCRUDを対応します。
# app/blog.py

from flask import (
    Blueprint, flash, g, redirect, render_template, request, url_for
)
from flask_login import current_user, login_required

from datetime import datetime
from . import model_datastore

bp = Blueprint('blog', __name__)


@bp.route('/', methods=['GET', 'POST'])
@login_required
def index():
    token = request.args.get('page_token', None)
    if token:
        token = token.encode('utf-8')

    posts, next_page_token = model_datastore.list(cursor=token)
    return render_template('blog/index.html',
                           posts=posts,
                           next_page_token=next_page_token)


@bp.route('/create', methods=('GET', 'POST'))
@login_required
def create():
    if request.method == 'POST':
        title = request.form['title']
        body = request.form['body']
        error = None

        if not title:
            error = 'Title is required.'

        if error is not None:
            flash(error)
        else:
            post = {'username': current_user.username,
                    'title': title,
                    'body': body,
                    'author_id': g.user.id,
                    'created': datetime.now().strftime("%Y/%m/%d %H:%M:%S")
                    }

            model_datastore.create(post)

            flash('Successfully added a new post.')

            return redirect(url_for('blog.index'))

    return render_template('blog/create.html')


@bp.route('/<int:id>/update', methods=('GET', 'POST'))
@login_required
def update(id):
    post = model_datastore.read(id)

    if request.method == 'POST':
        title = request.form['title']
        body = request.form['body']
        error = None

        if not title:
            error = 'Title is required.'

        if error is not None:
            flash(error)
        else:
            post = {
                    'username': current_user.username,
                    'title': title,
                    'body': body,
                    'author_id': g.user.id,
                    'created': datetime.now().strftime("%Y/%m/%d %H:%M:%S")
                    }

            model_datastore.create(post, id)

            flash('Successfully edited the post.')

        return redirect(url_for('blog.index'))

    return render_template('blog/update.html', post=post)


@bp.route('/<int:id>/delete', methods=('POST',))
@login_required
def delete(id):
    model_datastore.delete(id)
    flash('Successfully deleted the post.')

    return redirect(url_for('blog.index'))
7. 画面の修正
修正する画面はindexだけです。
# app/templates/blog/index.html

{% extends 'base.html' %}

{% block header %}
<h1>{% block title %}Posts{% endblock %}</h1>
{% if current_user.is_authenticated %}
<a class="action" href="{{ url_for('blog.create') }}">New</a>
{% endif %}
{% endblock %}

{% block content %}
{% for post in posts %}
<article class="post">
    {% if current_user.username == post.username %}
    <header>
        <div>
            <h1>{{ post.title }}</h1>
        </div>
        <a class="action" href="{{ url_for('blog.update', id=post.id) }}">Edit</a>
        <div class="about">by {{ post.username }} on {{ post.created }}</div>
    </header>
    <p class="body">{{ post.body }}</p>
</article>
{% if not loop.last %}
{% endif %}
<hr>
{% endif %}
{% endfor %}
{% endblock %}
8. 確認
Google CloudのAPI Client libraryをインストール
pip install gcloud
起動。
export FLASK_APP=run
export FLASK_ENV=development
flask run
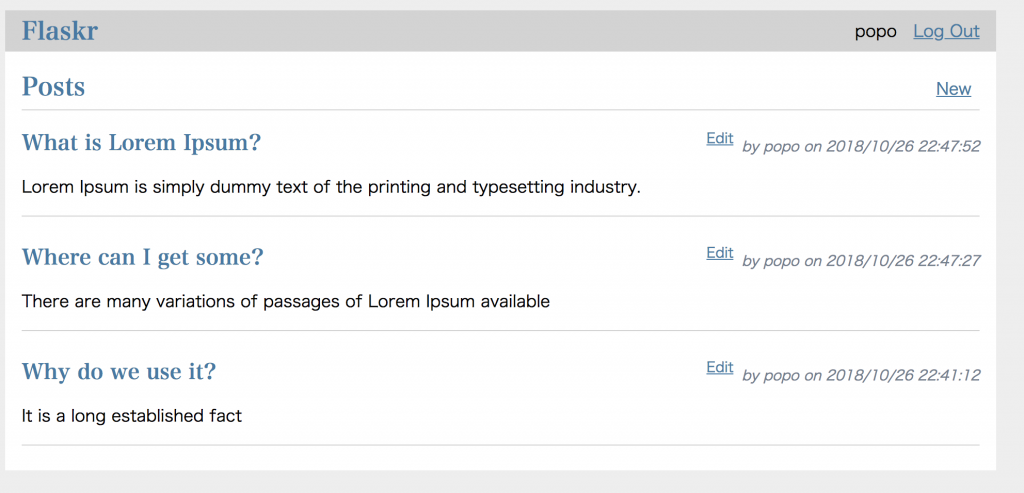
表示を確認して喜びます。
↓画面↓

↓Datastore↓

わーい。 でも...何か動作おせーー。。。ww
参考:
Python での Cloud Datastore の使用
Python Client for Google Cloud Datastore
Datastoreに外部からアクセスする方法
想ひ出18: GCP/Flask1.0/GCE/CloudSQLと接続

おはようございます、moqrinです。
前回、GCEにFlaskのチュートリアルのCRUDシステムをデプロイしました。
そいつをCloudSQLと接続しましょう、というお話です。
ちなみに、ちゃんとシステムを動かそうとすると、
f1.microでは無理でしたのでお気を付け下さいw
やること
1. MySQLをインストールする
2. IP アドレスを使用して MySQL クライアントを接続する設定する
3. DBを作成してconfigを書き換えてMigrationする
1. MySQLをインストールする
とりあえず、CloudSQLを作成しておきましょう。
そして、サーバーにドキュメント通り、MySQLクライアントをインストールしよう。
yum install mysql
コケる。。。
mariaDBをコロす。
yum -y remove mariadb-libs
MySQL57のリポジトリを追加してインストールする。
(pip install mysqlclientするためにMySQLサーバーも必要になるので注意です。)
rpm -Uvh http://dev.mysql.com/get/mysql-community-release-el7-5.noarch.rpm
yum install mysql-community-client mysql-community-server mysql-community-devel
pip install mysqlclient
コケる。。
手順はこのページ通り
2. IP アドレスを使用して MySQL クライアントを接続する設定する
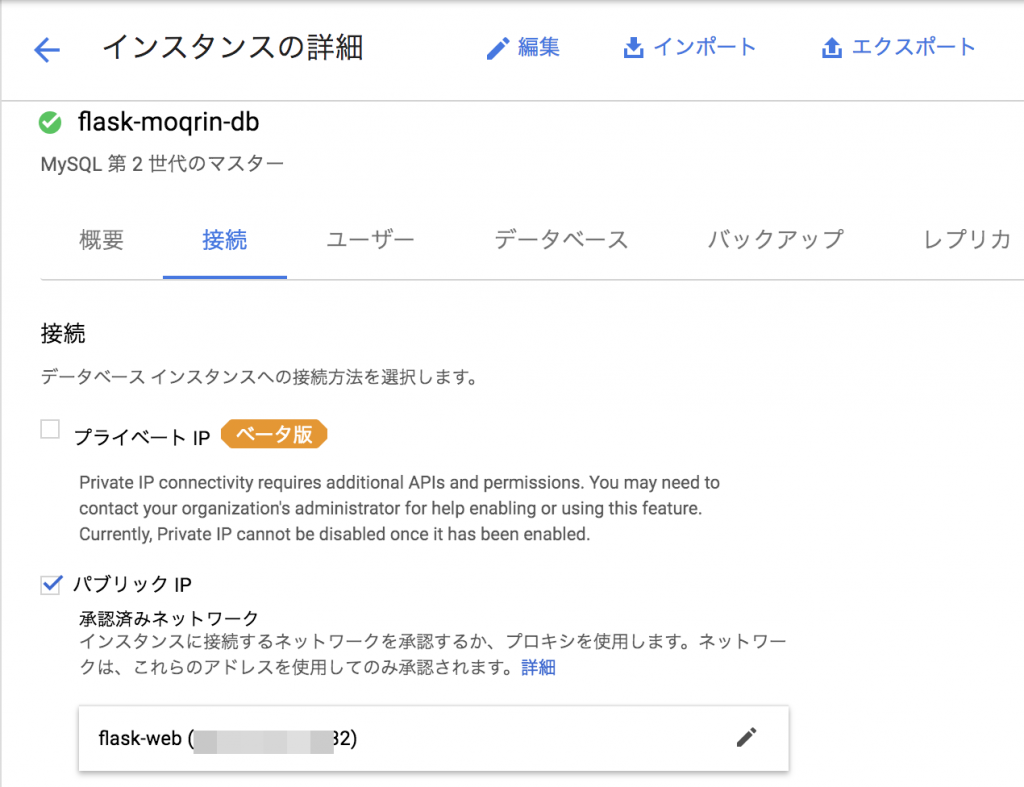
[承認] タブから[承認済みネットワーク] で [ネットワークを追加] をクリックし、
クライアントをインストールしたクライアント マシンの IP アドレスを入力する。
画像参照

暗号化しないで Cloud SQL インスタンスに接続する。
mysql -u root -h SQLのIP -p
3. DBを作成してconfigを書き換えてMigrationする
①DBを作成する。
create database flaskr_db;
grant all privileges on flaskr_db.* to moqrin3@"%" identified by 'pass' with grant option;
select user,host from mysql.user;
②(環境変数で切り替えるのが適切なのですが)configを書き換える。
# vi instance/config.py
...
SQLALCHEMY_DATABASE_URI = 'mysql://moqrin3:pass@SQLのIP/flaskr_db'
...
flask db init
flask db migrate
flask db upgrade
表示を確認して喜びます。
わーい。
参考:
想ひ出17: GCP/Flask1.0/Nginx/GCEにデプロイする

おはようございます、moqrinです。
前回、FlaskのチュートリアルのCRUDシステムを構築しました。
そいつをGCPのGCE(CentOS7)にデプロイしてみよう、
その際、uWSGIとNginxを利用してみよう、というお話になります。
なお、かなり原始的な対応をしておりますのでご了承下さいませ。。
ちなみに、CloudSQLへの接続は次回になっております。
やること
1. Python3の環境を設定する
2. プロジェクトをGitクローンしてvirtualenv環境にする
3. FlaskとuWSGIをインストールしてセットアップする
1. Python3の環境を設定する
とりあえず、まずSELinuxを停止しましょう! わたくしはこれで結構ヤラれました。。 参考URL
# vi /etc/selinux/config
SELINUX=disabled
そんでもって先に必要そうなものをインストールしておきます。
yum install -y nginx gcc git wget
Python3をCentOS7にインストールするためにIUS Community Projectのリポジトリを追加します。
yum install -y https://centos7.iuscommunity.org/ius-release.rpm
Python 3.6 をインストールします(3.6じゃなくてもいいけどw)
yum install -y python36u python36u-libs python36u-devel python36u-pip
エイリアスを設定します
ln -s /bin/python3.6 /bin/python3
pipをインストールします
wget https://bootstrap.pypa.io/get-pip.py
python get-pip.py
virtualenvをインストールします
pip install --upgrade virtualenv
2. プロジェクトをGitクローンしてvirtualenv環境にする
Gitクローンしてきます。 プロジェクトディレクトリをflaskrをします。 場所は下記とします。
cd /var/www/html/flaskr
virtualenvで切り替えます。
virtualenv --python python3 env
source env/bin/activate
3. FlaskとuWSGIをインストールしてセットアップする
pip install uwsgi flask flask-sqlalchemy flask-login flask-migrate
Create the WSGI Entry Point
# vi /flaskr/wsgi.py

from run import app

if __name__ == "__main__":
    app.run()
表示を確認します。このとき、nginxは起動させてちゃダメです。
uwsgi --socket 0.0.0.0:8000 --protocol=http -w wsgi:app
Creating a uWSGI Configuration File
# vi /flaskr/flaskr.ini

[uwsgi]
module = wsgi:app

master = true
processes = 5

socket = flaskr.sock
chmod-socket = 660
vacuum = true

die-on-term = true
Create a Systemd Unit File
# vi /etc/systemd/system/flaskr.service

[Unit]
Description=uWSGI instance to serve myproject
After=network.target

[Service]
User=moqrin3   // プロジェクトディレクトリのユーザーに合わせましょう
Group=nginx
WorkingDirectory=/var/www/html/flaskr
Environment="PATH=/var/www/html/flaskr/env/bin"
ExecStart=/var/www/html/flaskr/env/bin/uwsgi --ini flaskr.ini

[Install]
WantedBy=multi-user.target
起動させます
systemctl start flaskr
systemctl enable flaskr
Configuring Nginx to Proxy Requests
# vi /etc/nginx/conf.d/vhost.conf

    server {
        listen       80;
        server_name  moqrin3.flask.com;

        location / {
          include uwsgi_params;
          uwsgi_pass unix:/var/www/html/flaskr/flaskr.sock;
        }

        ...略
確認して起動します
nginx -t
systemctl start nginx
systemctl enable nginx
ホスト設定してブラウザで表示確認しましょう!
# vi /etc/hosts

InstanceIP moqrin3.flask.com
参考:
Python 開発環境のセットアップ
Python3をCentOS 7 に yum でインストールする手順
How To Serve Flask Applications with uWSGI and Nginx on Ubuntu 16.04
How To Serve Flask Applications with uWSGI and Nginx on CentOS 7
想ひ出16: Flask1.0のチュートリアルをMySQLで対応する

おはようございます、moqrinです。
GCPのドキュメントを読んでいると、サンプルのPythonアプリケーションでFlaskというフレームワークを使っています。
わたくしは時折、PHPやJava、Javascriptのフレームワークで何か書く場合がありますが、インフラ界隈ではPythonを使うべき機会が多いように思われます。
Pythonと仲良しになる上でも、サンプルのアプリケーションでクラウドサービスを試用する上でも、ちょいとFlaskをつまみ食いしようと思いました。
ということで、Flaskのチュートリアルをやってみました。
バージョンは1.0で、公式ではSQLite3で対応していますが、ここではMySQLで対応します。
チュートリアルを元にしていますが、随所で変更を入れています。
元の内容をベースに変更点や注意点を中心に記載しております。
疑問点や詳細の解説は参考URLや公式ドキュメントを確認頂ければと思います。
やること
1. 準備
2. Project Layout
3. Application Setup
4. Define and Access the Database
5. Blueprints and Views
6. Templates
7. Static Files
8. Blog Blueprint
1. 準備
データベースの接続に必要なモノをローカルにpipインストールしていきます。
(環境として、MacをローカルとしてPython3.X系のvirtualenvなりpyenvで考えています。)
pip install flask-sqlalchemy mysqlclient
すると、エラーが起きます。。わたしは起きました。 こんな感じのエラーです。
Command "python setup.py egg_info" failed with error code 1
結論、下記のように対応します。
mysql_configの場所を確認。
which mysql_config
vi /bin/mysql_config
とりあえず下記のようにmysql_configを編集。
libs="-L$pkglibdir"
#libs="$libs -l "
libs="$libs -lmysqlclient -lssl -lcrypto"
参考URL:
2. Project Layout
では順番通り進めていきます。
プロジェクトのレイアウトは以下のようになります。
この例ではマイグレーションをかますため、若干変更しています。
なお、微妙にディレクトリ名も異なっています。
/home/user/Projects/flaskr
├── app/
│   ├── __init__.py
│   ├── models.py
│   ├── auth.py
│   ├── blog.py
│   ├── templates/
│   │   ├── base.html
│   │   ├── auth/
│   │   │   ├── login.html
│   │   │   └── register.html
│   │   └── blog/
│   │       ├── create.html
│   │       ├── index.html
│   │       └── update.html
│   └── static/
│       └── style.css
├── instance/
│   ├── config.py
├──  run.py
└── .gitignore
3. Application Setup
接続するDB情報をセットアップします。
わたくしはDockerのMySQL5.7で対応しました。
# instance/config.py
SECRET_KEY = 'secret'
SQLALCHEMY_DATABASE_URI = 'mysql://root:passwd@127.0.0.1/flask_db'
SQLALCHEMY_TRACK_MODIFICATIONS = True
# app/__init__.py

import os

from flask import Flask
from flask_sqlalchemy import SQLAlchemy

db = SQLAlchemy()

def create_app(test_config=None):
    # create and configure the app
    app = Flask(__name__, instance_relative_config=True)

    if test_config is None:
        # load the instance config, if it exists, when not testing
        app.config.from_pyfile('config.py', silent=True)
    else:
        # load the test config if passed in
        app.config.from_mapping(test_config)

    db.init_app(app)

    # ensure the instance folder exists
    try:
        os.makedirs(app.instance_path)
    except OSError:
        pass

    # a simple page that says hello
    @app.route('/hello')
    def hello():
        return 'Hello, World!'

    return app
変更点として、SQLAlchemyを用いてデータベースに対して接続します。
以下で起動させます。
export FLASK_APP=run
export FLASK_ENV=development
flask run
4. Define and Access the Database
このパートは本家とは異なります。
ここを参考としています。(非常によく出来たチュートリアルです!こんなクソブログ見ている場合じゃありませんw)
後ほどログイン機能を作るので、以下インストールします。
使い方はここの通りです。
pip install flask-login
init.pyに追記します。
# app/__init__.py
...
from flask_login import LoginManager
login_manager = LoginManager()

...

def create_app(config_name):
    ...

    login_manager.init_app(app)
    login_manager.login_message = "You must be logged in to access this page."
    login_manager.login_view = "auth.login"
モデルを作成します。
# app/models.py

from app import db, login_manager
from flask_login import UserMixin

# UserMixinは入れておかないと怒られます
class User(UserMixin, db.Model):

    __tablename__ = 'user'

    id = db.Column(db.Integer, primary_key=True)
    username = db.Column(db.String(60), nullable=False, unique=True)
    password = db.Column(db.String(128), nullable=False)


@login_manager.user_loader
def load_user(user_id):
    return User.query.get(int(user_id))

class Post(db.Model):

    __tablename__ = 'post'

    id = db.Column(db.Integer, primary_key=True)
    author_id = db.Column(db.Integer, db.ForeignKey('user.id'), nullable=False)
    created = db.Column(db.TIMESTAMP, nullable=False)
    title = db.Column(db.String(200), nullable=False)
    body = db.Column(db.String(200), nullable=False)
マイグレーションの準備をします。
以下インストールします。
pip install flask-migrate
使い方はここの通りです。
init.pyに追記します。
# app/__init__.py
...
from flask_migrate import Migrate

...

def create_app(config_name):
    ...

    migrate = Migrate(app, db)
    from app import models
そしたら下記コマンドでマイグレーション対応完了です。
flask db init
flask db migrate
flask db upgrade
これで、DBに必要なテーブルが作成されているはずです。
それでは画面とルーティングに進みます。
5. Blueprints and Views
Flaskでは、画面とルーティングをBlueprintsという枠組みで作っていくようです。
各機能ごとで独立させたBlueprintを作成して、それを大元のファイルに読み込ませるというもののようです。
では公式の通り、ログイン機能となるauthファイルから。
後ほどブログ機能を実装します。
# app/auth.py

from flask import (
    Blueprint, flash, g, redirect, render_template, request, session, url_for
)
from werkzeug.security import check_password_hash, generate_password_hash
from . import db
from .models import User

from flask_login import login_required, login_user, logout_user

bp = Blueprint('auth', __name__, url_prefix='/auth')
init.pyにauthのblueprintを登録します。
# app/__init__.py

def create_app():
    app = ...

    # existing code omitted

    from . import auth
    app.register_blueprint(auth.bp)

    return app
ルーティングと画面の設定をしましょう〜。
まずはユーザー登録画面です。
# app/auth.py

@bp.route('/register', methods=('GET', 'POST'))
def register():
    if request.method == 'POST':
        username = request.form['username']
        password = request.form['password']
        password = generate_password_hash(password)
        error = None
        user = User(username=username,
                    password=password)

        if not username:
            error = 'Username is required.'
        elif not password:
            error = 'Password is required.'

        if error is None:
            db.session.add(user)
            db.session.commit()
            flash('Successfully added a new user.')
            return redirect(url_for('auth.login'))

        flash(error)

    return render_template('auth/register.html')
お次はログイン画面です。
# app/auth.py

@bp.route('/login', methods=('GET', 'POST'))
def login():
    if request.method == 'POST':
        username = request.form['username']
        password = request.form['password']
        error = None
        user = User.query.filter_by(username=username).first()

        if user is None:
            error = 'Incorrect username.'
        elif not check_password_hash(user.password, password):
            error = 'Incorrect password.'

        if error is None:
            session.clear()
            session['user_id'] = user.id
            login_user(user)
            return redirect(url_for('index'))

        flash(error)

    return render_template('auth/login.html')
セッション情報を取得しておくメソッドになります。
# app/auth.py

@bp.before_app_request
def load_logged_in_user():
    user_id = session.get('user_id')

    if user_id is None:
        g.user = None
    else:
        g.user = User.query.get(user_id)
そしてログアウト機能。
# app/auth.py

@bp.route('/logout')
@login_required
def logout():
    session.clear()
    logout_user()
    flash('Logged out.')

    return redirect(url_for('auth.login'))
6. Templates
テンプレートはほぼそのままです。
The Base Layout
# app/templates/base.html

<!doctype html>
<title>{% block title %}{% endblock %} - Flaskr</title>
<link rel="stylesheet" href="{{ url_for('static', filename='style.css') }}">
<nav>
    <h1><a href="{{ url_for('index') }}">Flaskr</a></h1>
    <ul>
        {% if current_user.is_authenticated %}
        <li><span>{{ current_user.username }}</span>
        <li><a href="{{ url_for('auth.logout') }}">Log Out</a>
            {% else %}
        <li><a href="{{ url_for('auth.register') }}">Register</a>
        <li><a href="{{ url_for('auth.login') }}">Log In</a>
            {% endif %}
    </ul>
</nav>
<section class="content">
    <header>
        {% block header %}{% endblock %}
    </header>
    {% for message in get_flashed_messages() %}
    <div class="flash">{{ message }}</div>
    {% endfor %}
    {% block content %}{% endblock %}
</section>
Register
# app/templates/auth/register.htm

{% extends 'base.html' %}

{% block header %}
<h1>{% block title %}Register{% endblock %}</h1>
{% endblock %}

{% block content %}
<form method="post">
    <label for="username">Username</label>
    <input name="username" id="username" required>
    <label for="password">Password</label>
    <input type="password" name="password" id="password" required>
    <input type="submit" value="Register">
</form>
{% endblock %}
Log In
# app/templates/auth/login.html

{% extends 'base.html' %}

{% block header %}
<h1>{% block title %}Log In{% endblock %}</h1>
{% endblock %}

{% block content %}
<form method="post">
    <label for="username">Username</label>
    <input name="username" id="username" required>
    <label for="password">Password</label>
    <input type="password" name="password" id="password" required>
    <input type="submit" value="Log In">
</form>
{% endblock %}
7. Static Files
そのままです。
8. Blog Blueprint
ブログ機能のBlueprintになります。
# app/blog.py

from flask import (
    Blueprint, flash, g, redirect, render_template, request, url_for
)
from flask_login import current_user, login_required

from . import db
from .models import Post

bp = Blueprint('blog', __name__)
init.pyにauthのblueprintを登録します。
# app/__init__.py

def create_app():
    app = ...
    # existing code omitted

    from . import blog
    app.register_blueprint(blog.bp)
    app.add_url_rule('/', endpoint='index')

    return app
では、ルーティングと画面の設定をしましょう。
Index
# app/blog.py

@bp.route('/', methods=['GET', 'POST'])
@login_required
def index():
    posts = db.session.query(Post). \
        filter(Post.author_id == g.user.id). \
        all()
    return render_template('blog/index.html', posts=posts)
# app/templates/blog/index.html
{% extends 'base.html' %}

{% block header %}
<h1>{% block title %}Posts{% endblock %}</h1>
{% if current_user.is_authenticated %}
<a class="action" href="{{ url_for('blog.create') }}">New</a>
{% endif %}
{% endblock %}

{% block content %}
{% for post in posts %}
<article class="post">
    <header>
        <div>
            <h1>{{ post.title }}</h1>
            <div class="about">by {{ post.username }} on {{ post.created.strftime('%Y-%m-%d') }}</div>
        </div>
        <a class="action" href="{{ url_for('blog.update', id=post.id) }}">Edit</a>
    </header>
    <p class="body">{{ post.body }}</p>
</article>
{% if not loop.last %}
<hr>
{% endif %}
{% endfor %}
{% endblock %}
Create
# app/blog.py

@bp.route('/create', methods=('GET', 'POST'))
@login_required
def create():
    if request.method == 'POST':
        title = request.form['title']
        body = request.form['body']
        error = None

        if not title:
            error = 'Title is required.'

        if error is not None:
            flash(error)
        else:
            post = Post(title=title,
                        body=body,
                        author_id=g.user.id)

            db.session.add(post)
            db.session.commit()
            flash('Successfully added a new post.')

            return redirect(url_for('blog.index'))

    return render_template('blog/create.html')
# app/templates/blog/create.html

{% extends 'base.html' %}

{% block header %}
<h1>{% block title %}New Post{% endblock %}</h1>
{% endblock %}

{% block content %}
<form method="post">
    <label for="title">Title</label>
    <input name="title" id="title" value="{{ request.form['title'] }}" required>
    <label for="body">Body</label>
    <textarea name="body" id="body">{{ request.form['body'] }}</textarea>
    <input type="submit" value="Save">
</form>
{% endblock %}
Update
# app/blog.py

@bp.route('/<int:id>/update', methods=('GET', 'POST'))
@login_required
def update(id):

    post = Post.query.get_or_404(id)

    if request.method == 'POST':
        title = request.form['title']
        body = request.form['body']
        error = None

        if not title:
            error = 'Title is required.'

        if error is not None:
            flash(error)
        else:
            post.id = id
            post.title = title
            post.body = body
            db.session.commit()
            flash('Successfully edited the post.')

        return redirect(url_for('blog.index'))

    return render_template('blog/update.html', post=post)
# app/templates/blog/update.html

{% extends 'base.html' %}

{% block header %}
<h1>{% block title %}Edit "{{ post['title'] }}"{% endblock %}</h1>
{% endblock %}

{% block content %}
<form method="post">
    <label for="title">Title</label>
    <input name="title" id="title"
           value="{{ request.form['title'] or post['title'] }}" required>
    <label for="body">Body</label>
    <textarea name="body" id="body">{{ request.form['body'] or post['body'] }}</textarea>
    <input type="submit" value="Save">
</form>
<hr>
<form action="{{ url_for('blog.delete', id=post['id']) }}" method="post">
    <input class="danger" type="submit" value="Delete" onclick="return confirm('Are you sure?');">
</form>
{% endblock %}
Delete
# app/blog.py

@bp.route('/<int:id>/delete', methods=('POST',))
@login_required
def delete(id):
    post = Post.query.get_or_404(id)
    db.session.delete(post)
    db.session.commit()
    flash('Successfully deleted the post.')
    return redirect(url_for('blog.index'))
最後にrun.pyを作成しておきましょう。
次回で使います。
# app/run.py

import os

from app import create_app

config_name = os.getenv('FLASK_CONFIG')
app = create_app()


if __name__ == '__main__':
    app.run()
以上です!
とりあえず、CRUDシステムが完了したのでここまでとしました。
続きはデプロイしちゃいます!
参考:
Build a CRUD Web App With Python and Flask
Flask-Login
Flask-Migrate